Display Purchase Order - ME23N (ME23N)
Purpose
Use this procedure to display an existing purchase order.
When To Do This
Perform this procedure when you need to display
information in a purchase order such as scheduled quantity, open quantity, or
net unit price of a purchase order item. You can also check to see if a goods
receipt or an invoice has been entered for that purchase order line item.
Prerequisites
·
A purchase order must exist in the system.
Menu Path
Use the following menu path to begin this transaction:
·
Select Logistics
Transaction Code
Helpful Hints
·
R/O/C: "R" = Required, "O" = Optional, "C" =
Conditional.
·
Changes made directly to purchase orders in SAP by users are not
allowed. Any SAP relevant changes to an Ariba purchase requisition will result
in the corresponding SAP purchase order being updated with the changes via the
Ariba to SAP PO interface.
Procedure
1. Start
the transaction using the menu path or transaction code.
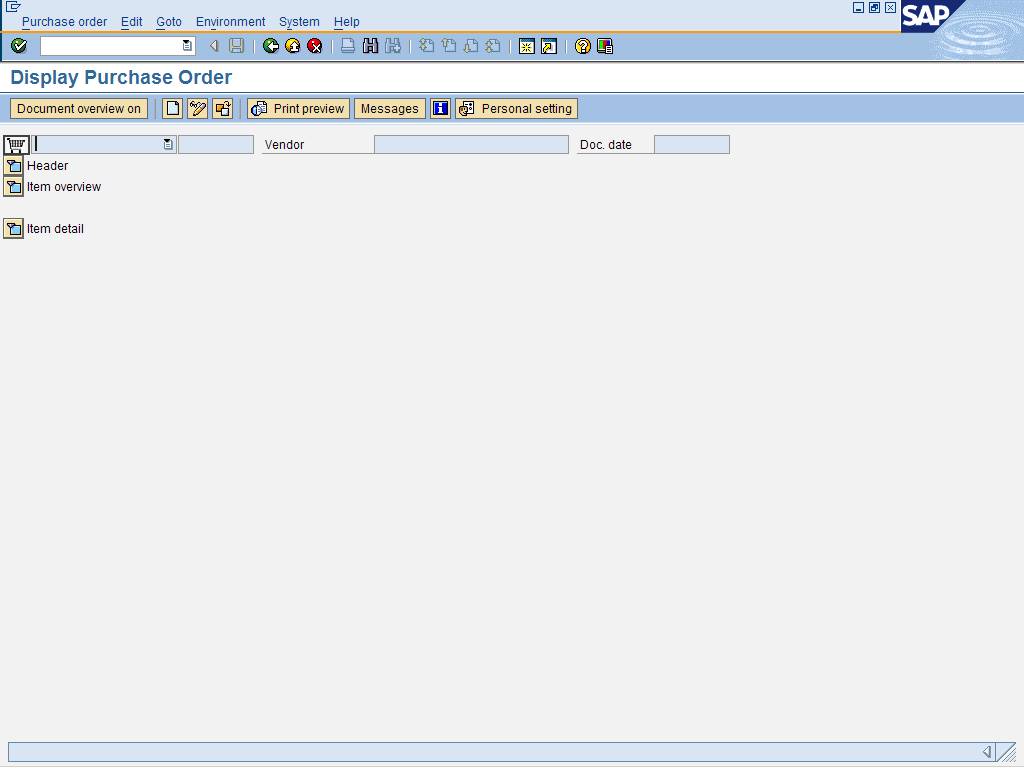
Display
Purchase Order
 In the screen above, the Header, Item
overview, and Item detail sections
are collapsed. To display fields, you will need to expand the appropriate section
by clicking
In the screen above, the Header, Item
overview, and Item detail sections
are collapsed. To display fields, you will need to expand the appropriate section
by clicking  next to the
section name. While you are working in a particular section, it is often
convenient to collapse the other sections to view more of the screen without
scrolling. To collapse a particular section, click
next to the
section name. While you are working in a particular section, it is often
convenient to collapse the other sections to view more of the screen without
scrolling. To collapse a particular section, click  next to the section name. Throughout this work
instruction, you will be referred to a particular section. The work
instruction assumes that you will expand and collapse sections as appropriate
without further instruction.
next to the section name. Throughout this work
instruction, you will be referred to a particular section. The work
instruction assumes that you will expand and collapse sections as appropriate
without further instruction.
2. Perform one of the following:
|
If
|
Go To
|
|
The purchase order does not come up on the initial screen,
or you want to display a different purchase order
|
Step 3
|
|
The purchase order you want to display does come up on the
initial screen
|
Step 6
|
3. Click  to go to the Select
Document window.
to go to the Select
Document window.
Select
Document
4. As required, complete/review the following field:
|
Field Name
|
R/O/C
|
Description
|
|
Pur. order
|
R
|
Document used to
purchase materials and services from vendors.
Example: 4500000010
|
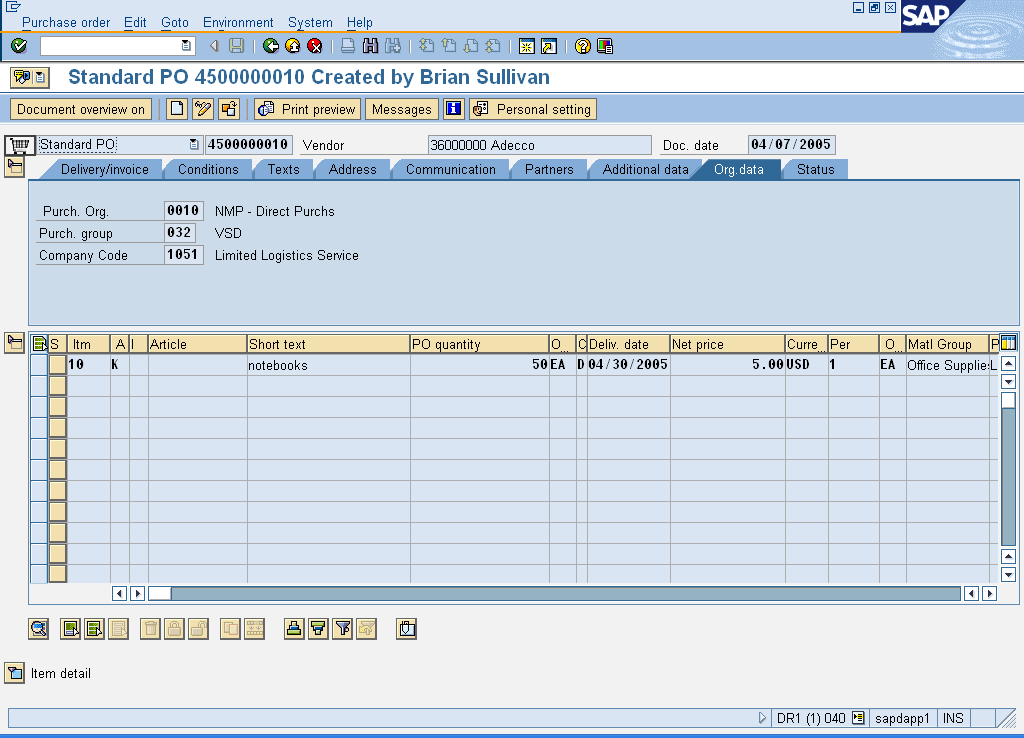
5. Click  to go to the Standard
PO XXXX Created by YYYY (Header) (Org. data) screen.
to go to the Standard
PO XXXX Created by YYYY (Header) (Org. data) screen.
Standard PO XXXX Created by YYYY (Header) (Org. data)
6. Review the displayed information.
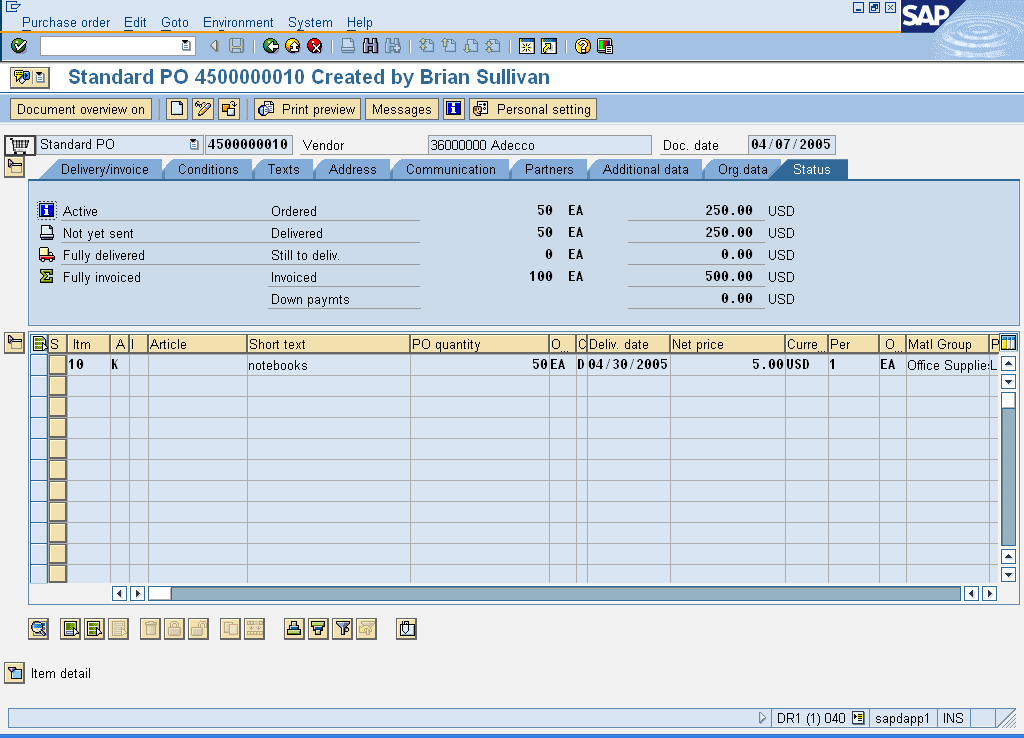
7. Click the  tab to go to the Standard
PO XXXX Created by YYYY (Header) (Status) screen.
tab to go to the Standard
PO XXXX Created by YYYY (Header) (Status) screen.
Standard PO XXXX Created by YYYY (Header) (Status)
8. Review the displayed information.
9. Click the  tab to go to the Standard
PO XXXX Created by YYYY (Header) (Delivery/invoice) screen.
tab to go to the Standard
PO XXXX Created by YYYY (Header) (Delivery/invoice) screen.
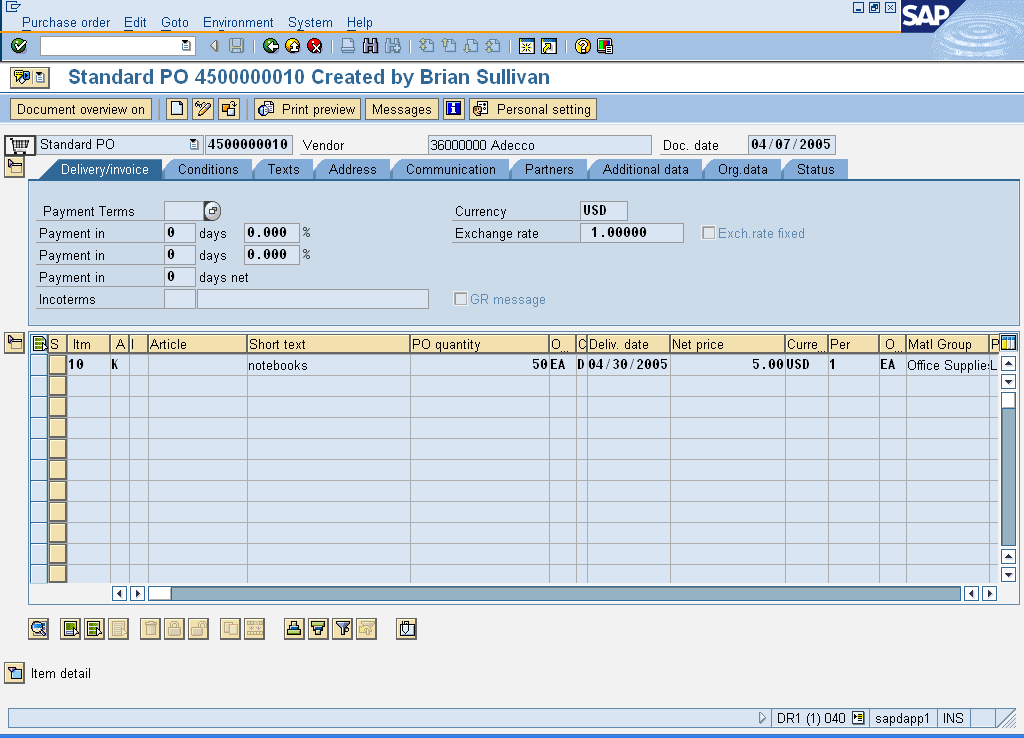
Standard PO XXXX Created by YYYY (Header) (Delivery/invoice)
10. Review the displayed information.
11. Click  to expand the Item
detail section go to the Standard PO XXXX Created by YYYY (Item detail) screen.
to expand the Item
detail section go to the Standard PO XXXX Created by YYYY (Item detail) screen.
Standard PO XXXX Created by YYYY (Item detail)
You will need to use the horizontal (or
vertical) scroll bar to view all the fields in this section.
12. Click the  to go to the Standard
PO XXXX Created by YYYY (Item detail) (Delivery schedule) screen.
to go to the Standard
PO XXXX Created by YYYY (Item detail) (Delivery schedule) screen.
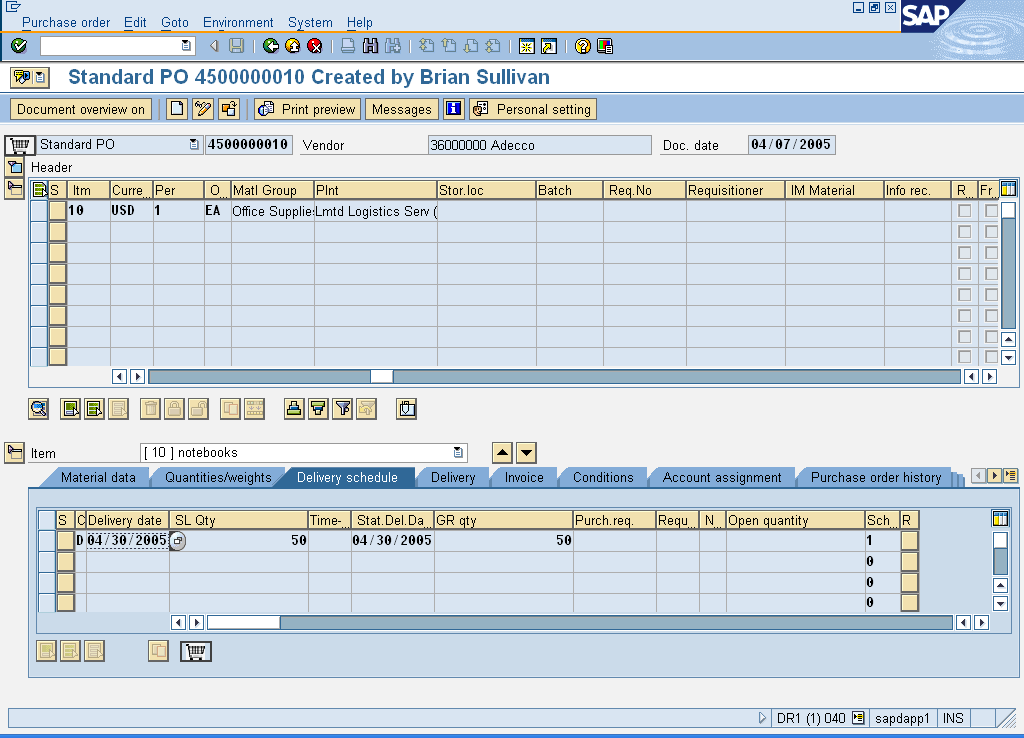
Standard PO XXXX Created by YYYY (Item detail) (Delivery schedule)
13. Review the displayed information.
14. Click the  tab to go to the Standard
PO XXXX Created by YYYY (Item detail) (Delivery) screen.
tab to go to the Standard
PO XXXX Created by YYYY (Item detail) (Delivery) screen.
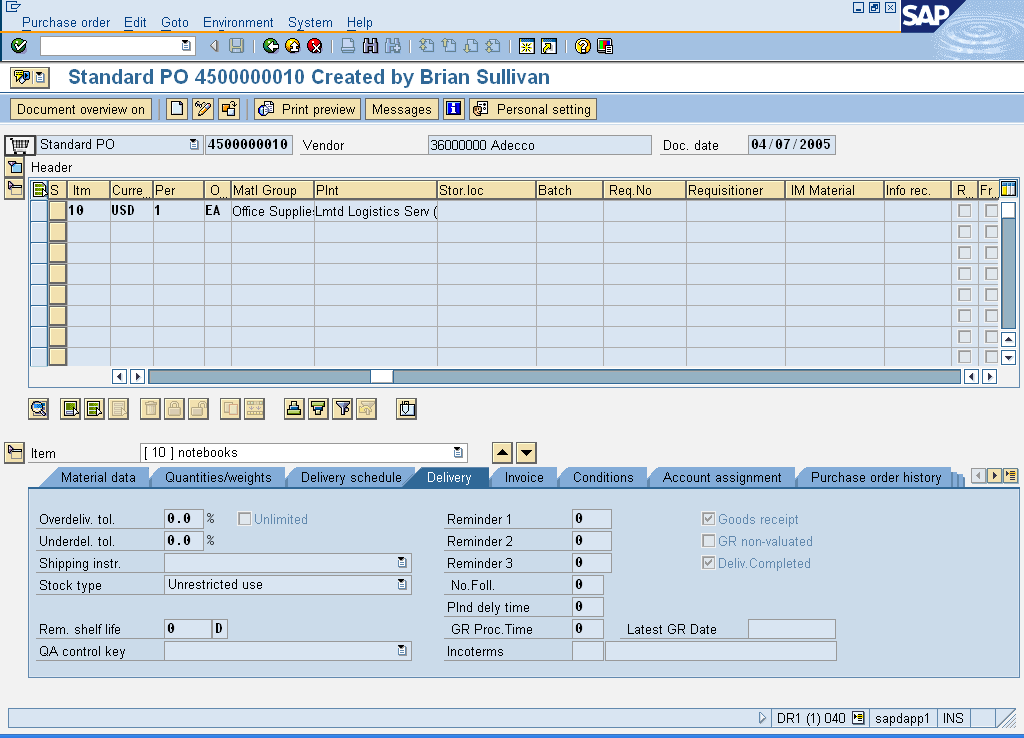
Standard PO XXXX Created by YYYY (Item detail) (Delivery)
15. Review the displayed information.
16. Click the  tab to go to the Standard
PO XXXX Created by YYYY (Item detail) (Invoice) screen.
tab to go to the Standard
PO XXXX Created by YYYY (Item detail) (Invoice) screen.
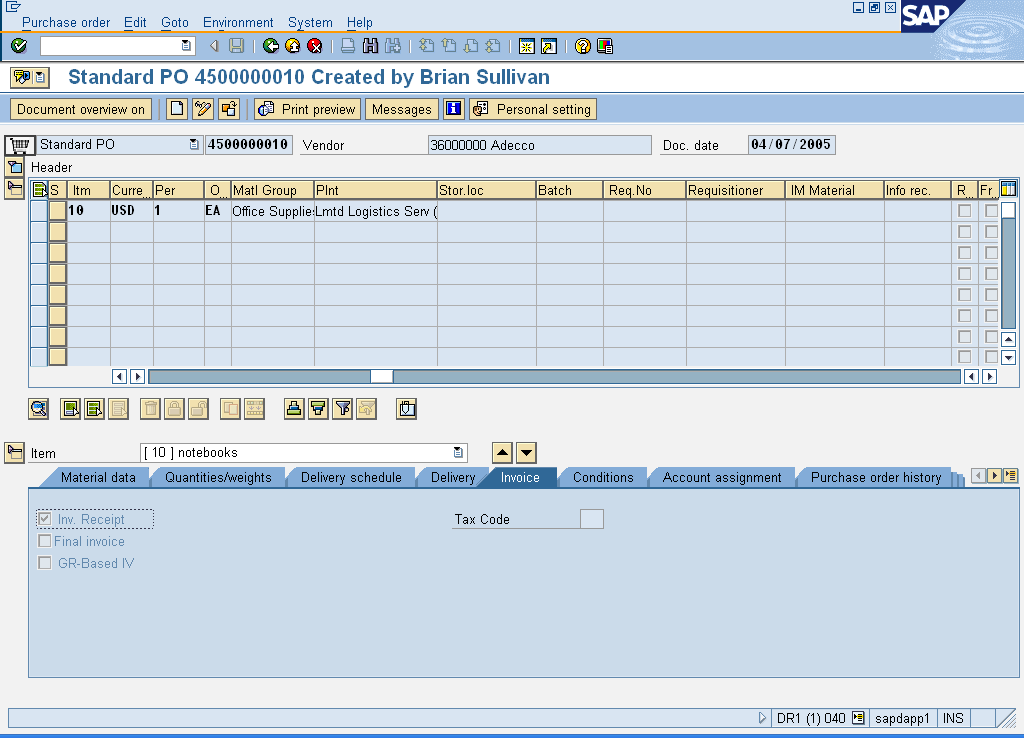
Standard PO XXXX Created by YYYY (Item detail) (Invoice)
If the Inv Receipt flag is not
checked, the PO item is a free item, and you cannot create an invoice for the
item.
17. Review the displayed information.
18. Click the  tab to go to the Standard
PO XXXX Created by YYYY (Item detail) (Account assignment) screen
tab to go to the Standard
PO XXXX Created by YYYY (Item detail) (Account assignment) screen
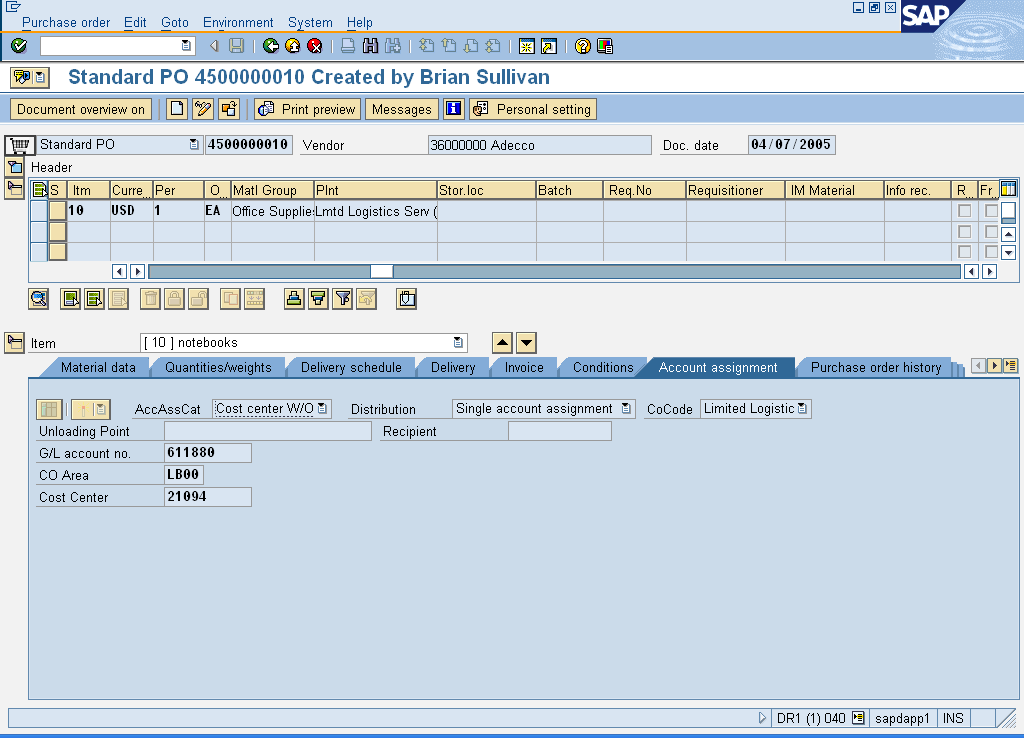
Standard PO XXXX Created by YYYY (Item detail) (Account assignment)
19. Review the displayed information.
20. Click the  tab to go to the Standard
PO XXXX Created by YYYY (Item detail) (Purchase order history) screen.
tab to go to the Standard
PO XXXX Created by YYYY (Item detail) (Purchase order history) screen.
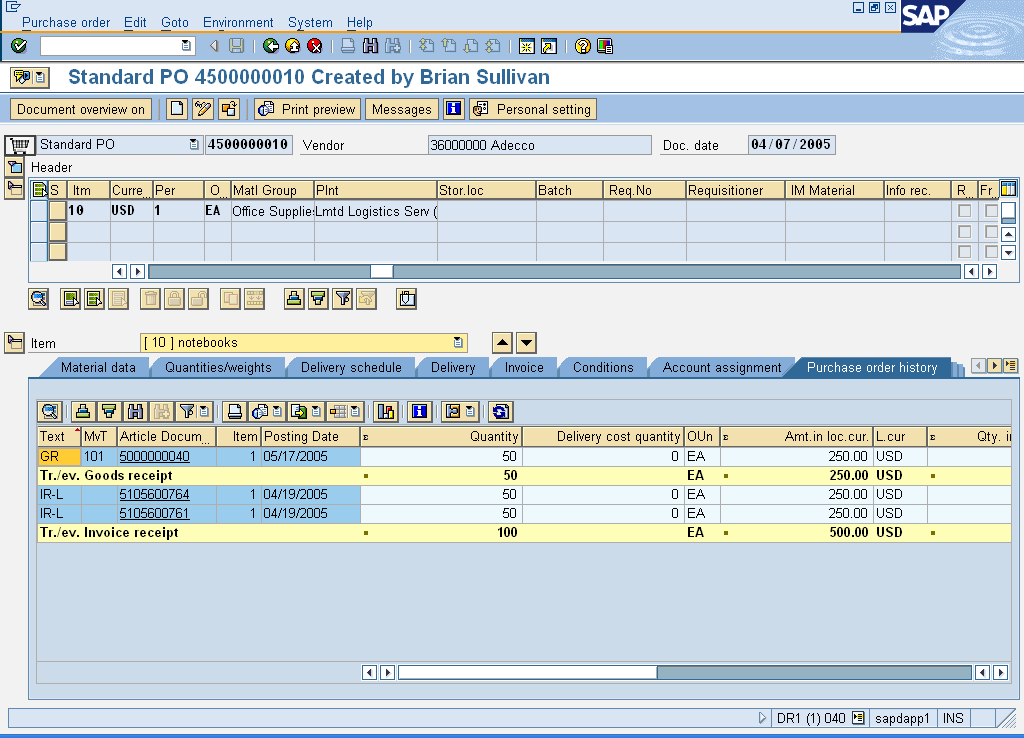
Standard PO XXXX Created by YYYY (Item detail) (Purchase order history)
21. Review the displayed information.
22. Click  to exit this transaction.
23. You
have completed this transaction.
Result
You have successfully displayed an existing purchase
order.
Comments
None