Procedure
1. Please refer to the "Internal Controls Procedures" for manual procedures that
are critical to ensuring an effective control environment for this activity.
2. Start the activity using the appropriate menu path or transaction code as
applicable.
3. Perform one of the following:
|
If
|
Then
|
Go To
|
|
Creating Outbound Delivery Document
|
Use transaction
code VL01N
|
Step 4
|
|
Changing Outbound Delivery Document
|
Use transaction
code VL02N
|
Step 12
|
|
Displaying Outbound Delivery Document
|
Use transaction
code VL03N
|
Step 34
|
|
Posting Goods Issue manually for GL2 Personal Care and GL3
Sell from Stock
|
Use transaction
code VL06G
|
Step 41
|
|
Printing and/or e-mailing Delivery Document to vendor and
Shipment Confirmation to customer for GL2 Personal Care and GL3 Sell from
Stock
|
Use transaction
code VL03N
|
Step 51
|
|
Reversing Post Goods Issue
|
Use transaction
code VL09
|
Step 64
|
|
Exiting this procedure
|
|
Step 75
|
4. Use transaction code VL01N to Create Outbound Delivery with Order Reference
Create
Outbound Delivery with Order Reference
5. As required, complete/review the following fields:
|
Field Name
|
R/O/C
|
Description
|
|
Shipping point
|
R
|
Physical location from
which an item is shipped.
 This will be the site from
which the outbound shipment will be shipped. This will be the site from
which the outbound shipment will be shipped.
Example: Z015
|
|
Selection date
|
R
|
Delivery of goods will
be selected for processing based upon this date.
If a Sales Order is also
entered, the system checks the delivery selection date against each schedule line for each item. If either the material availability date
or the transportation planning date
falls on or before the delivery selection date, the system copies the item
into the delivery.
The current date is the
default value.
|
|
Order
|
R
|
Sales, production,
process, purchase, internal, or work order number that uniquely identifies a
document.
Sales Order number.
Example: 50000477
|
6. Click  to go to the "Delivery XXXX Create: Overview" screen.
Delivery
XXXX Create: Overview
Many of the required fields are
populated from the Sales Order data.
The Item Overview tab  is the default view. The other tab areas
are typically used to update the data of an existing Delivery Document.
is the default view. The other tab areas
are typically used to update the data of an existing Delivery Document.
7. As required, complete/review the following fields:
|
Field Name
|
R/O/C
|
Description
|
|
Ship-to party
|
R
|
Person or company that
receives the goods.
LBI customer the goods are
being shipped to.
Example:
20000012
|
|
Planned GI
|
R
|
Description of this term
Planned Goods Issue date of the
outbound shipment.
Example: 12/13/2005
|
|
Actual GI
|
O
|
Actual Goods Issue date.
For a Return Shipment, Actual GI is the date the return shipment is received
from the customer. The Goods Receipt execution will have an impact on inventory
and finance.
Actual Goods Issue date of the
outbound shipment to the customer, if different from the planned date.
Posting the Goods Issue creates the Article Document and the Accounting
Document that generate the financial inventory postings.
|
|
Total Weight
|
R
|
The total gross weight
of all articles being ordered
Weight of the shipment.
Example: 40 oz
|
|
Article
|
R
|
The smallest unit that
can be sold to a customer or replenished individually using replenishment
planning. An article is also the lowest level at which inventory can be
managed.
Example: 20000255
|
|
Delivery quantity
|
R
|
Quantity of material to
be delivered.
Example: 10
|
|
SU
|
R
|
Sales Unit of Measure.
Example: EA
|
|
Description
|
R
|
Text to identify and
characterize an object or activity.
Description of the articles
that are being sent to the customer.
Example: 4 OZ MASS OI,
Eucalyptus Spearmint, Shelf
|
|
Supply Site
|
R
|
The site from which the
shipment is being sent.
Example: Z015
|
Use 
 to scroll the item lines to the left and right to
view hidden fields.
to scroll the item lines to the left and right to
view hidden fields.
8. Click  to save the
Delivery Document.
to save the
Delivery Document.
The system displays the message,
"Delivery XXXX has been saved". The Delivery Document number is generated
by the system and listed in the system message and in the Outbound Deliv. field.
9. Click  to exit the
transaction.
to exit the
transaction.
10. Go to step 3 to select another Delivery
transaction or to exit the activity.
11. The Create Outbound Delivery activity is completed.
12. Use transaction code VL02N to Change Outbound Delivery:
Change Outbound Delivery
13. As required, complete the following field:
|
Field Name
|
R/O/C
|
Description
|
|
Outbound Delivery
|
R
|
Document generated in
SAP that triggers pick, pack and ship activities.
Outbound Delivery Document number.
Example: 80000311
|
14. Click  to go to the Delivery XXXX Change: Overview screen.
Delivery
XXXX Change: Overview
For personal care, if the Sales Order ships
from a Limited Brands Distribution Center, the Pick
Quantity, Total Weight, No. of packages (cartons), Batch numbers (if applicable), and relevant
comment Text will be updated by the
interface with the Shipping/Picking system (PKMS) used at the Limited Brands
Distribution Centers. Alternately, if the Sales Order ships from a vendor
location, these data items will be provided by the vendor associated using the
Collaboration Hub (CHub) application interface.
For apparel, the Delivery Document is
updated when the Post Goods Issue is executed on the Outbound Delivery, from
the 3 Way Matching Report between the Factory, Forwarder/Consolidator and CFS
EDI feeds of carton count. The Pick Quantity is updated from the
Inbound Delivery that is created from the Factory 856 ASN EDI feed. The
shipment details such as MAWB/OBOL number, Broker
reference, DO date, Trailer number and Vessel
name are updated from the Consolidator, Forwarder,
Customs and CFS EDI feeds.
For apparel sell from
stock such as the Vendor Managed Inventory (VMI) scenario, the Delivery
document needs to be updated manually with the Pick Quantities as it does not
go through the 3 Way Matching Report
15. As required, complete/review the following fields from the Item Overview tab:
|
Field Name
|
R/O/C
|
Description
|
|
Planned GI
|
R
|
Description of this term
Planned Goods Issue date of the outbound
shipment.
Example: 12/13/2005
|
|
Actual GI date
|
O
|
Actual Goods Issue date.
Actual Goods Issue date of the outbound
shipment to the customer, if different from the planned date.
Example: 12/12/2005
|
|
Total Weight
|
R
|
The total gross weight
of all articles being ordered
Weight of the shipment.
Example: 40
oz
|
|
Delivery quantity
|
R
|
Quantity of material to
be delivered.
Example: 10
|
16. As required, complete/review the following fields from the Picking tab:
|
Field Name
|
R/O/C
|
Description
|
|
Pick Date/Time
|
R
|
Date/Time the delivery
is planned to be picked for shipment.
|
|
Delivery quantity
|
R
|
Quantity of material to
be delivered.
Example: 10
|
|
Pick quantity
|
R
|
Quantity of an item
which needs to be removed from its current storage location, prepared for
shipping and appears on the printed picking list.
Article quantity that was picked for
shipment
|
|
Batch
|
O
|
Number that uniquely
assigns a material manufactured in a lot. The batch material is managed separately
from other sets of the same material. Also, used to describe the running of
multiple non-manual transactions in SAP.
Individual
product number for batch-managed product, if applicable
|
 If Pick quantity
is less than Delivery quantity in Delivery
Document, the Delivery quantity field may
be adjusted to match Pick quantity so that
the Post Goods Issue can be executed.
If Pick quantity
is less than Delivery quantity in Delivery
Document, the Delivery quantity field may
be adjusted to match Pick quantity so that
the Post Goods Issue can be executed.
Any variations in quantities that
can be shipped from quantities ordered (listed on the Sales Order), would
require the Sales Order document to be changed to reflect the actual shipped
quantities, prior to updating the Delivery Document with the actual quantity
shipped.
If there is a mismatch in the
carton count from the 3 Way
Matching Report between the Factory, Forwarder/Consolidator and CFS EDI feeds,
manual intervention and investigation is needed. The relevant corrected ASN's
need to be sent again so that there is a 3 way match, which will facilitate the
update of the Delivery Doc and the PGI.
For gift card orders in personal care, the Serial Nos , Special
Processing and UPS/Fedex number
fields will need to be entered in the Delivery Document. This data will need to
be manually entered by the sales associate based on information received from
the DC or vendor.
17. Perform one of the following:
|
If
|
Then
|
Go To
|
|
Picking gift card articles for GL2 Corporate Sales, if
applicable
|
Gift card Serial Numbers (beginning number and ending
number range) must be entered in the Delivery document.
|
Step 18
|
|
Picking manually
|
|
Step 22
|
18. Click  (the field left of Item in the All
Items area) to select the desired Delivery Item.
(the field left of Item in the All
Items area) to select the desired Delivery Item.
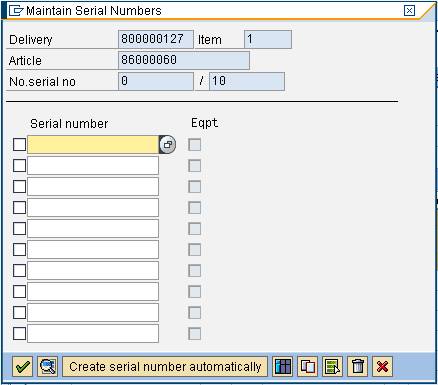
19. From the Menu bar, click Extras to display the Maintain Serial Numbers window.
Maintain
Serial Numbers
20. As required, complete/review the following fields:
|
Field Name
|
R/O/C
|
Description
|
|
Serial number
|
R
|
Number that combined
with a material number uniquely identifies a specific instance of the
material for tracking purposes.
Enter the range of gift card serial
numbers picked for the Delivery. Enter the beginning serial number in the
first Serial number field and the ending
serial number in the next Serial number
field.
Example: 6000600060006000999
|
21. Click  to accept entry and
continue.
to accept entry and
continue.
Repeat steps
18 - 21 for each Delivery
Item containing a gift card Article.
22. As required, complete/review the following fields from the Loading tab:
|
Field Name
|
R/O/C
|
Description
|
|
Loading Date
|
O
|
Date on which an order
was loaded onto the transportation carrier.
Date and time Delivery was loaded into
transportation vehicle for shipment.
|
|
Gross weight
|
O
|
Weight of the material,
including packaging.
Gross weight of article that was loaded
for shipment.
|
|
WUn
|
O
|
Weight unit of measure.
Unit of measure for gross weight.
Example: LB
|
23. As required, complete/review the following fields from the Transport tab:
|
Field Name
|
R/O/C
|
Description
|
|
TransptnPlanng
|
O
|
The date by which you
must arrange transportation so that the delivery can reach the customer on
time.
Date and time Delivery needs to be
shipped to reach customer by requested date.
|
|
Gross weight
|
O
|
Weight of the material,
including packaging.
Gross weight of article that was loaded
for shipment
|
|
WUn
|
O
|
Weight unit of measure.
Unit of measure for gross weight.
Example: LB
|
24. Click  to go to the Delivery XXXX Change Header Details screen.
Delivery
XXXX Change: Header Details
25. Click  tab to go to the Delivery XXXX Change: Header Details (Texts)
screen.
tab to go to the Delivery XXXX Change: Header Details (Texts)
screen.
Delivery
XXXX Change: Header Details (Texts)
The Texts
tab may be used to enter any pertinent text comment regarding the Delivery
Document.
Example: Special case packing will be used
26. Select text type (Txt Ty) from those listed.
Txt Ty
of "External/Billing comments" and "Delivery Information" will be displayed in
the Delivery Document and printed on the Shipment Confirmation sent to the
customer, if applicable. Txt Ty of
"Internal comments" will only be displayed in the Delivery Document, not
printed on any output documents.
27. Click  to display any existing
comments for the text type selected.
to display any existing
comments for the text type selected.
28. Click in the large, white text box and type the comment to add to the Delivery
Document.
29. Click  to go to the Delivery XXXX Change: Overview screen.
Delivery
Retail XXXX Change: Overview
30. Click to save the changes.
The system displays the message,
"Delivery XXXX has been saved".
31. Click to exit the transaction.
32. Return to step 3 to select another Delivery
transaction or to exit the procedure.
33. The Change Outbound Delivery activity is complete.
34. Use transaction code VL03N to Display Outbound Delivery
Display
Outbound Delivery
The Delivery document can also be accessed
from the document flow function in the Sales Order.
35. As required, complete the following field:
|
Field Name
|
R/O/C
|
Description
|
|
Outbound Delivery
|
R
|
Document generated in
SAP that triggers pick, pack and ship activities.
Outbound Delivery Document number.
Example: 80000311
|
36. Click to go to the Delivery XXXX Display: Overview screen.
Delivery
XXXX Display: Overview
It
is important to verify that the information displayed in the Ship-to party, Planned
GI, Actual GI date, Total Weight, Article,
Delivery quantity, SU, Description,
Site fields are accurate.
Additional
information may be viewed by clicking on the Picking,
Loading, Transport,
Status Overview and Goods Movement Data tabs available from the Delivery XXXX Display: Overview screen.
37. To view additional detail for the Delivery Document, perform one of the
following:
|
If
|
Then
|
|
Requesting display of Picking information
|
Click the Picking tab

|
|
Requesting display of Loading information
|
Click the Loading tab

|
|
Requesting display of Shipping information
|
Click the Transport
tab 
|
|
Requesting display of Delivery status information
|
Click the Status Overview
tab 
|
|
Requesting display of Goods Movement information
|
Click the Goods Movement
Data tab 
|
|
Requesting display of Delivery header data
|
Click
Multiple tabbed areas are available for
display.
Click  to
return to the Delivery XXXX Display: Overview
screen to
return to the Delivery XXXX Display: Overview
screen
|
|
Requesting display of Delivery comment text
|
Click to
go to the Delivery XXXX Change: Header Details
screen
Click the Texts tab 
Click to
return to the Delivery XXXX Display: Overview
screen
|
38. Click to exit the transaction.
39. Return to step 3 to select another Delivery
transaction or to exit the procedure.
40. The Display Outbound Delivery is complete.
41. Use transaction code VL06G to execute the Outbound Deliveries for Goods Issue
Outbound
Deliveries for Goods Issue
42. As required, complete/review the following fields:
|
Field Name
|
R/O/C
|
Description
|
|
Shipping Point/Receiving Pt
|
R
|
Physical location from
which an item is shipped/received.
LBI site from which goods are shipped. A
range of shipping/receiving point values may be entered. The beginning value
is entered in the Shipping Point/Receiving Pt
field and the ending value is entered in the to
field.
Example: Z015
|
|
Pland gds mvmnt date
|
O
|
Date on which the goods
are planned to be moved in the system
This field may be used to indicate a date
or date range as selection criteria for selecting outbound Delivery
Documents. If a date range is entered, the beginning value is entered in the
Pland gds mvmnt date field and the
ending value is entered in the to field.
|
43. Click  to go to the Goods Issue for Outbound Deliveries to be Posted
screen.
to go to the Goods Issue for Outbound Deliveries to be Posted
screen.
A list of Outbound Delivery Documents
requiring Goods Issue Posting is displayed.
Goods
Issue for Outbound Deliveries to be Posted
44. Click  (to the left of the
Delivery document number) to select the appropriate Delivery Document.
(to the left of the
Delivery document number) to select the appropriate Delivery Document.
45. Click  to update the Delivery
Document with the actual shipping date (the date that the goods left the
shipping point).
to update the Delivery
Document with the actual shipping date (the date that the goods left the
shipping point).
Specify Actual
Goods Issue Date
46. As required, complete/review the following field:
|
Field Name
|
R/O/C
|
Description
|
|
Act. gds mvmnt date
|
R
|
Actual goods movement
date.
Actual date the goods were shipped if
different from the planned ship date.
Example: 12/12/2005
|
47. Click  to validate the goods
movement date entered.
to validate the goods
movement date entered.
Goods
Issue for Outbound Deliveries to be Posted
The system confirms the goods movements,
indicating transaction success and/or any problems. The message "X successful
and X incorrect goods movement" is displayed.
For GL3, The Goods
Issue serves to transfer the ownership of goods between Mast entities and
between Mast and the customer.
48. Click to exit this
transaction.
49. Go to step 3 to select another Delivery
transaction or to exit this procedure.
50. The Post Goods Issue activity is complete.
51. In order to print or send, use transaction code VL03N to Display Outbound
Delivery
Display
Outbound Delivery
52. As required, complete/review the following field:
|
Field Name
|
R/O/C
|
Description
|
|
Outbound Delivery
|
R
|
Document generated in
SAP that triggers pick, pack and ship activities.
Outbound Delivery Document number.
Example: 80000311
|
Display
Outbound Delivery
53. Select to e-mail and/or
print, if needed
Output
output
There are two types of Delivery Document
output for Personal Care: Delivery Note
and Shipment Confirmation. The Delivery Note is typically sent to the
fulfillment vendor and the Shipment Confirmation
is typically sent to the customer. Delivery output may be printed as hardcopy
or transmitted electronically via e-mail.
54. Click  (field left of Message type in each row of the Output section)
to select the appropriate Delivery Document.
(field left of Message type in each row of the Output section)
to select the appropriate Delivery Document.
Output
output
55. Click  to select the printer,
recipient and other output options.
to select the printer,
recipient and other output options.
Issue
Output
56. As required, complete/review the following fields:
|
Field Name
|
R/O/C
|
Description
|
|
Logical destination
|
R
|
Description of this term
This field specifies the name of the
printer or the e-mail address to direct the Delivery Document output to. If
needed, select "LOCL" in order to print to the default printer of a user
Example: Insightprt8
|
|
Recipient
|
R
|
Person who is to receive
the material or service.
The recipient of the printed output will
be included in this field.
|
|
Department
|
O
|
Organizational
department to which the cost center created will be assigned. Also, a group
of machines or production lines that do similar manufacturing operations.
|
|
Cover Page Text
|
O
|
Text that is to be
included on the cover page of the Delivery Document output.
|
|
Print Immediately
|
O
|
Indicator used to
specify that the Delivery Document output is to be printed immediately after
completing the transaction.
This option is typically used most often.
|
|
Release after output
|
O
|
Indicator that is used
to release the Delivery after the output print request is processed.
When checked, this option will release
the Delivery after the print request is processed.
|
57. Click  to establish the
settings.
to establish the
settings.
Output
output
58. Click  to preview a copy of the
Delivery Document output (either Delivery Document or Shipment Confirmation).
to preview a copy of the
Delivery Document output (either Delivery Document or Shipment Confirmation).
A screen shot of each is displayed as an
example.
Print
Preview XXXX (Delivery Document)
Print
Preview of XXXX (Shipment confirmation)
59. Click to go back to the Output output screen (Delivery Document output
selection).
60. Click  to print and/or e-mail
output to the vendor as needed.
to print and/or e-mail
output to the vendor as needed.
The system confirms that the e-mail and/or
printed output was successfully generated.
For Sell from Stock, if a vendor is
shipping directly to a customer, a fax of the Delivery Document will need to be
manually sent to this vendor if they cannot access this Delivery Document via
the CHub access system.
The type of output that will be generated
for the customer (e-mail or printed) is defined in the Customer Master data
record.
61. Click to exit the transaction.
62. Return to step 3 to select another Delivery activity
or to exit the procedure.
63. The printing/emailing Delivery Document activity is complete.
64. Use transaction code VL09 to Reverse Goods Movement
Reverse
goods movement
The Reverse Post Goods Issue is used to
cancel or correct errors in the original Post Goods Issue. After a reversal, a
corrected Post Goods Issue (PGI) for the Delivery may again be executed.
65. As required, complete/review the following fields:
|
Field Name
|
R/O/C
|
Description
|
|
Shipping point
|
O
|
Physical location from
which an item is shipped.
LBI site from which goods are shipped. A
range of shipping point values may be entered. The beginning value is entered
in the Shipping Point field and the
ending value is entered in the to field.
This may comprise of a vendor site or warehouse for personal care and
production office or warehouse for apparel
Example: Z015
|
|
Goods movement date
|
O
|
The date the Post Goods
Issue was completed.
A range of dates may be entered. The
beginning date is entered in the Goods movement
date field and the ending date is entered in the to field.
|
|
Inbound / outbound delivery
|
O
|
Description of this term
Outbound Delivery Document number. A
range of Delivery Document values may be entered. The beginning value is
entered in the Inbound/outbound delivery
field and the ending value is entered in the to
field.
Example: 80000311
|
66. Perform one of the following:
|
If
|
Then
|
|
Selecting from both Inbound and Outbound Delivery
Documents
|
Click  Inbound Delivs & Outbound Delivs Inbound Delivs & Outbound Delivs
|
|
Selecting from Outbound Delivery Documents only
|
Click Outbound del.
Use this option for Sales Order shipments
to customers.
|
|
Selecting from Inbound Delivery Documents only
|
Click Inbound dlvs
Use this option for Inbound Deliveries
from vendors.
|
These fields are used as selection criteria
to return a list of Delivery Documents matching the criteria entered.
67. Click to display the list of
Delivery Documents matching selection criteria supplied.
Reverse
goods movement
68. Click (field left of Delivery in each row) to select the appropriate
Delivery Document.
69. Click  to reverse the Post
Goods Issue of the selected Delivery Document.
to reverse the Post
Goods Issue of the selected Delivery Document.
A confirmation message box will be
displayed.
Confirm.
Prompt
70. Click to confirm the reversal
of the previous Post Goods Issue.
The Error
log for reversal: Display messages window will be displayed. This
window lists the system messages that indicate the success of the transaction
or any errors that may have occurred. The colored boxes in the Typ column indicate success (green), warning
(yellow) and error (red).
Error log
for reversal: Display messages
The Reverse Post Goods Issue will have
implications on inventory movement and accounting journal entries.
It is not advisable to
Reverse Post Goods Issue if the Billing document output has been generated
already. If only the Billing doc has been created in SAP but not sent to the
customer, then cancel the Billing doc followed by the reversal of the Post
Goods Issue
71. Click to acknowledge the Display messages and complete the transaction.
Reverse
goods movement
72. Click to exit the transaction.
73. Go to step 3 to select another Delivery
transaction or to exit this procedure.
74. The Post Goods Issue Reversal activity is complete.
75. This
procedure is now complete.
Result
Depending upon the transaction used, one of the following
will result:
1) A
Sales Order Delivery Document was created, changed or displayed
2) A
Post Goods Issue was completed for the Delivery
3) The
Delivery Document output was sent to the fulfillment vendor and the Shipment
Confirmation output was sent to the customer (for personal care)
4) The
Post Goods Issue for the Delivery is reversed. Inventory quantities are
reinstated
Comments
The creation of the Delivery Document and Post Goods Issue
execution is followed by the Proof of Delivery (if needed) and the creation of
the Billing Document.